In this crash course, we’ll explore how to set up a simple pipeline using GitHub Actions, with a focus on building a GoLang application.
Github Actions are similar to Jenkins, Gitlab CI/CD or Travis CI. Understanding one can help you master the others easily.
Purpose of GitHub Actions:
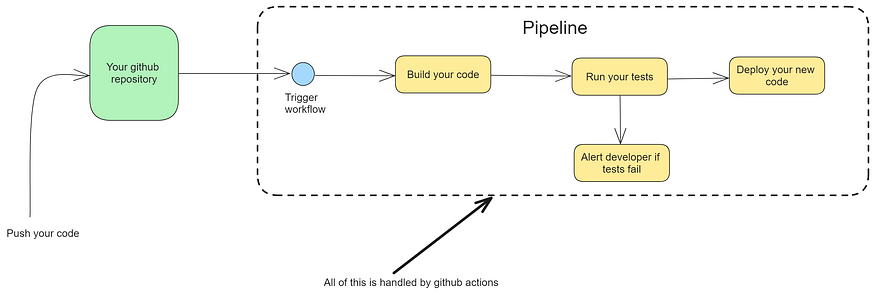
GitHub Actions Pipelines automate repetitive and time-consuming tasks involved in the software development lifecycle, such as building, testing, and deploying code changes.
By defining workflows as code, we can streamline our development processes and reduce manual intervention.

Basically, all you as a developer has to do is define how and what tests to run, how to compile your code and how to deploy your code (ex: docker, Vercel, etc.) in a _.yam_l file.
That’s it! Now when you push a new piece of code, Github launches a new container in one of their servers and runs the actions you have defined in your YAML file.
Writing the Go code:
The first step in using github actions is writing our code in some language. We will be using Golang and creating a simple calculator. We will also write the unit tests for the code.
Install Golang if you haven’t already. Follow the steps here.
Create a new folder in your computer and run go mod init
go mod init <your project name>
This will create a go.mod file in your directory.
Now create a main.go file and add the following code
package calculator

func Add(a, b int) int {
 return a + b
}

// Subtract returns the difference between two integers.
func Subtract(a, b int) int {
 return a - b
}

// Multiply returns the product of two integers.
func Multiply(a, b int) int {
 return a * b
}

// Divide returns the result of dividing two integers.
// It returns -1 if the divisor is zero.
func Divide(a, b int) int {
 if b == 0 {
  return -1
 }
 return a / b
}
Also, create a main_test.go file and add the following code
package calculator_test

import (
 "testing"

 "github.com/your-username/your-repository/calculator" // Replace with your actual module path
)

func TestAdd(t *testing.T) {
 result := calculator.Add(5, 3)
 expected := 8
 if result != expected {
  t.Errorf("Add(5, 3) = %d; expected %d", result, expected)
 }
}

func TestSubtract(t *testing.T) {
 result := calculator.Subtract(5, 3)
 expected := 2
 if result != expected {
  t.Errorf("Subtract(5, 3) = %d; expected %d", result, expected)
 }
}

func TestMultiply(t *testing.T) {
 result := calculator.Multiply(5, 3)
 expected := 15
 if result != expected {
  t.Errorf("Multiply(5, 3) = %d; expected %d", result, expected)
 }
}

func TestDivide(t *testing.T) {
 result := calculator.Divide(6, 3)
 expected := 2
 if result != expected {
  t.Errorf("Divide(6, 3) = %d; expected %d", result, expected)
 }

 result = calculator.Divide(6, 0)
 expected = -1
 if result != expected {
  t.Errorf("Divide(6, 0) = %d; expected %d", result, expected)
 }
}
You can run these tests locally to verify if everything is working fine by running go test in your project’s root directory. It should give a similar output to this
Addition Test Passed
Subtraction Test Passed
Multiplication Test Passed
Division Test Passed
Division by Zero Test Passed
PASS
ok github.com/benmeehan/go-cal 0.017s
Creating a GitHub Actions Pipeline:
GitHub Actions Pipelines are defined using YAML files stored in the .github/workflows directory of your project. These YAML files contain the configuration for your workflows, including the triggers, jobs, and steps to be executed.
Understanding Workflows:
- Triggers: Workflows are triggered by specific events, such as pushes to the repository, pull requests, or scheduled intervals. You can define the events that trigger your workflow in the YAML file.
- Jobs: Each workflow consists of one or more jobs, which represent a sequence of steps to be executed. Jobs can run sequentially or in parallel, depending on your configuration.
- Steps: Jobs are composed of individual steps, which are the building blocks of your pipeline. Each step performs a specific action, such as checking out code, running tests, or deploying artifacts.
- Environments: Workflows can specify environments, such as operating systems or virtual machines, on which jobs are executed. You can choose from a variety of environments provided by GitHub, including Ubuntu, macOS, and Windows.
The best way to understand these is by writing the pipeline. So, let’s get into it.
Writing YAML for Our Pipeline:
Create a new file in the .github/workflows directory of your project with .yml or .yaml extension, say go-pipeline.yaml . Each file in this folder is a seperate pipeline.
name: GoLang Build and Test

on:
  push:
    branches:
      - main
  pull_request:
    branches:
      - main

jobs:
  build:
    runs-on: ubuntu-latest

    steps:
    - name: Checkout Repository
      uses: actions/checkout@v2

    - name: Set up Go
      uses: actions/setup-go@v2
      with:
        go-version: '1.17'

    - name: Build
      run: go build -v ./...

    - name: Test
      run: go test -v ./...
In this file,
Name
The name field specifies the name of the pipeline. In this case, it's "GoLang Build and Test"
Triggers:
The on field defines the trigger events for the workflow. It specifies that the workflow should run:
- In this case, on
pushorpull_requestevents to themainbranch.
Jobs:
The jobs section defines a job named build, which will be executed when the trigger conditions are met. The runs-on field specifies the type of virtual environment where the job will run. Here, it's set to ubuntu-latest, indicating that the job will run on the latest version of Ubuntu.
Steps:
Steps are the individual tasks that the job will perform. Each step is specified under the steps section.
Checkout Repository: This step checks out the repository's code into the runner's workspace. It uses theactions/checkout@v2action, which is a pre-built action provided by GitHub Actions.Set up Go: This step sets up the Go environment on the runner. It uses theactions/setup-go@v2action, specifying Go version 1.17.Build: This step builds the GoLang project using thego buildcommand. The-vflag enables verbose output, providing more detailed information during the build process.Test: This step runs the tests for the GoLang project using thego testcommand. The-vflag enables verbose output, displaying detailed information about the test execution.
Pushing to GitHub:
This is how your project should look like or something similar for other languages.
└───.github
    └───workflows
        └───go-pipeline.yaml
└───main.go
└───main_test.go
└───go.mod
Now, initialize a git repository locally and commit all your files
git init
git add .
git commit -m "your commit message"
Next, create a Github repository and link it with your local following the given steps. Then push your code to remote using
git push
Watching The Workflow Run:
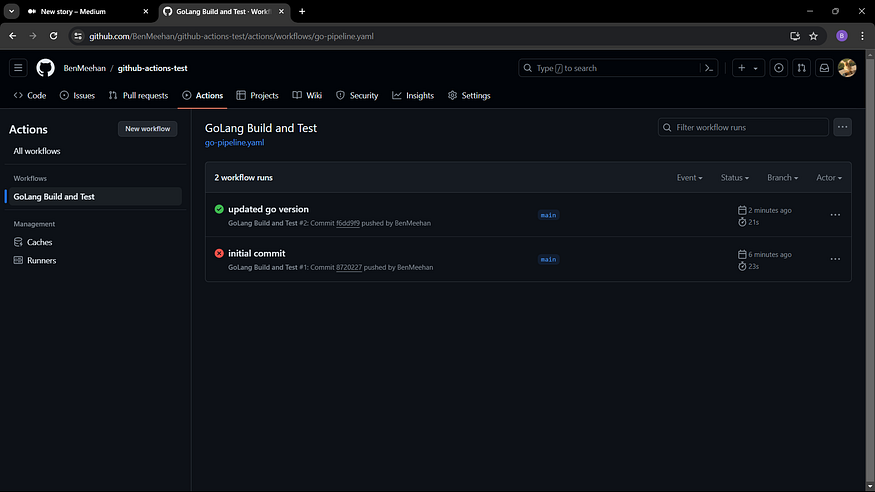
Now if you go to your GitHub repository and go to the Actions section, you can see your pipelines getting executed.

Here is the link to my to code and pipelines: Link
Next Steps:
- Explore Advanced Features: GitHub Actions offers many advanced features such as matrix builds, caching, Linking pipelines and environment variables.
- Integrate Deployment: Extend your pipeline to include deployment steps, such as building Docker images or deploying to cloud platforms like AWS, Azure, or Google Cloud.
- Add Code Quality Checks: Integrate code quality checks into your pipeline using tools like linters, static analyzers, and code coverage tools.
- Continuous Improvement: Setup alerts to monitor the failures.
Until next time 👋!
